6 Steps to Successful Tree Grafting
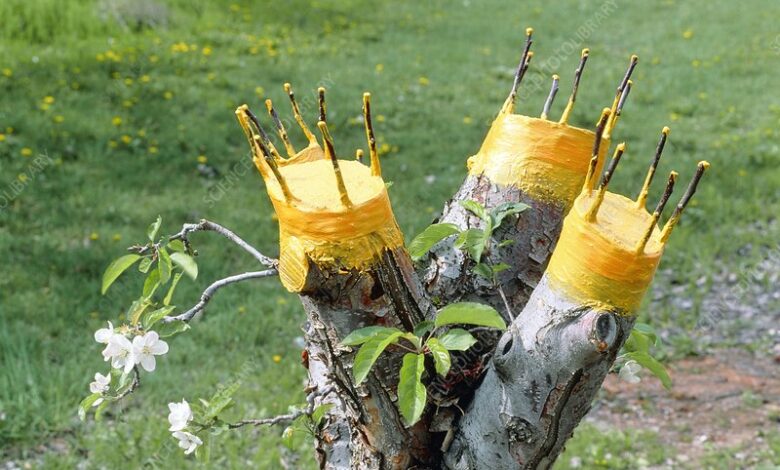
Grafting fruit trees is a practical technique for gardeners aiming to enhance their orchards with specific varieties or improve tree performance. This method joins a scion, the upper part of the graft carrying desired traits, to a rootstock, which provides the root system and influences growth characteristics. By mastering grafting, gardeners can propagate superior cultivars, repair damaged trees, or create unique multi-variety trees. This article outlines six clear steps to achieve successful grafts, tailored for British gardeners. A nursery specialist from Fruit-Trees.com advises that careful selection of compatible scion and rootstock is critical for success. They recommend sourcing high-quality materials to ensure robust unions, particularly when choosing fruit. This guide provides a structured approach to grafting, ensuring reliable results for both novice and experienced gardeners.
Step 1: Understand Grafting and Its Benefits
Grafting involves uniting two plant parts so their vascular tissues grow together, forming a single plant. The scion, typically a shoot or bud from a desired cultivar, contributes the fruiting or flowering traits. The rootstock, the lower portion, determines traits like size, hardiness, and disease resistance. For British gardeners, grafting offers several advantages. It allows propagation of apple trees or other fruit varieties that do not grow true from seed, ensuring consistency in fruit quality. Grafting can also create dwarf trees, ideal for smaller gardens, or introduce disease-resistant rootstocks to combat issues like apple scab, common in the UK’s damp climate.
Compatibility between scion and rootstock is essential. For instance, grafting an apple scion onto a pear rootstock often fails due to genetic differences. Closely related species, such as different apple cultivars, are more likely to form strong unions. Gardeners can buy fruit trees with proven rootstocks, such as M26 or MM106 for apples, to ensure compatibility and vigour. Timing is another key factor. Late winter to early spring, when trees are dormant but sap is beginning to flow, is optimal for most grafting techniques in the UK.
Step 2: Select the Right Materials and Tools
Successful grafting requires high-quality plant material and precise tools. Choose a healthy scion from a disease-free tree, ideally a vigorous shoot from the previous season’s growth, about 30 centimetres long with several buds. The scion should be pencil-thick, roughly 6 to 10 millimetres in diameter. Rootstocks should match the scion’s diameter for techniques like whip-and-tongue grafting, though larger rootstocks work for methods like cleft grafting. Gardeners can buy fruit trees with established rootstocks from reputable nurseries to ensure quality and compatibility.
Tools must be sharp and sterile to prevent infection and ensure clean cuts. A grafting knife with a thin, sharp blade is ideal for precise incisions. Secateurs, a saw for larger branches, and a sharpening stone are also necessary. Grafting tape, rubber bands, or raffia secure the graft, while grafting wax or sealant protects the union from drying out. Isopropyl alcohol wipes keep tools clean between cuts, reducing disease transmission. Preparing materials in advance streamlines the process and improves outcomes.
Step 3: Choose an Appropriate Grafting Technique
Several grafting techniques suit fruit trees, each with specific applications. The whip-and-tongue graft is popular for apple trees due to its strong union and high success rate. This method involves making diagonal cuts on both scion and rootstock, with a secondary tongue cut to interlock them. It suits scions and rootstocks of similar diameter, typically under 1.5 centimetres. Cleft grafting is effective for top-working older trees, where a larger rootstock is split, and a wedge-shaped scion is inserted. This method suits rejuvenating established orchards.
Budding, particularly T-budding, is another option, especially in late summer. A single bud is inserted into a T-shaped cut in the rootstock’s bark, ideal for propagating multiple trees from limited scion wood. The four-flap graft, though complex, maximises cambium contact and is used for pecans but can work for apples. British gardeners often prefer whip-and-tongue or cleft grafting for apples due to their reliability in the UK’s climate. Select a technique based on tree size, scion availability, and your skill level.
Step 4: Prepare the Scion and Rootstock
Preparation is critical for aligning the cambium layers, the actively growing tissue under the bark where fusion occurs. For whip-and-tongue grafting, cut the scion and rootstock at a 45-degree angle, about 4 to 5 times the diameter in length, ensuring a smooth, flat surface. Make a secondary vertical cut on each to create a tongue, allowing them to interlock tightly. For cleft grafting, saw the rootstock flat, then split it 5 to 7.5 centimetres deep. Trim the scion into a wedge, ensuring one side is slightly thicker to align with the rootstock’s cambium.
For T-budding, make a shallow T-shaped incision in the rootstock’s bark, lifting it to insert a bud cut from the scion. The bud should include a thin layer of wood and bark, exposing the green cambium. Keep scions moist during preparation by wrapping them in damp paper towels or storing them in a plastic bag at 4 to 7 degrees Celsius. Rootstocks should be healthy and free of damage. Proper alignment of cambium layers is non-negotiable, as misalignment leads to graft failure.
Step 5: Secure and Protect the Graft
Once the scion and rootstock are joined, secure the graft to maintain contact between cambium layers. Use grafting tape or rubber bands to wrap the union tightly, ensuring stability without damaging the tissue. For whip-and-tongue grafts, the interlocking tongues often hold the scion in place, but tape reinforces the bond. In cleft grafting, insert two scions on opposite sides of the split, then wrap tightly. T-budding requires wrapping above and below the bud, leaving it exposed to grow.
Apply grafting wax or a sealant to the union to prevent desiccation and infection. Heavy-duty aluminium foil or plastic wrap can further protect the graft, especially in the UK’s variable weather. Label the graft with the cultivar name and date to track progress. Gardeners looking to buy fruit trees with specific traits, such as dwarfing or disease resistance, should ensure the rootstock supports these goals. Check the graft after a week to ensure it remains secure and moist.
Step 6: Monitor and Care for the Grafted Tree
Post-grafting care determines long-term success. Keep the graft site moist but not waterlogged, as excess water can cause rot. In the UK’s often wet climate, ensure good drainage around the rootstock. Protect the graft from pests and physical damage using insect netting or tree guards, particularly in areas with high pest pressure. New growth, such as buds or shoots, typically appears within 15 to 30 days, indicating a successful graft.
After 6 to 8 weeks, remove grafting tape to prevent girdling, but leave sealant if it’s not restricting growth. Prune any shoots below the graft to direct energy to the scion. Apply a balanced fertiliser once strong growth is evident, typically in late spring. Regular monitoring for signs of rejection, such as wilting or discolouration, allows early intervention. If the graft fails, reassess cambium alignment, compatibility, or aftercare practices. Patience is key, as grafts may take months to fully establish.
Common Challenges and Solutions
Graft failure often stems from poor cambium alignment, incompatible scion and rootstock, or inadequate aftercare. Ensure precise cuts and check compatibility before grafting. For example, apples graft well onto M9 or M27 rootstocks for dwarfing, available when you buy fruit trees from trusted suppliers. Drying out is another issue; always seal grafts and maintain humidity. In the UK, late frosts can damage new grafts, so consider protective covers during unpredictable spring weather. Sterilising tools between cuts prevents disease transmission, a common problem in damp climates.
Advanced Tips for British Gardeners
For those with experience, experimenting with multi-variety grafts can create trees bearing different apple cultivars, ideal for small gardens. Timing grafts to coincide with the UK’s early spring sap flow, typically February to March, improves success rates. Bench grafting, done indoors during winter, allows gardeners to prepare new trees for spring planting. Always source scions from healthy, productive trees to ensure quality. Gardeners can buy fruit trees or rootstocks from nurseries offering cultivars suited to local conditions, enhancing graft success.
The Long-Term Rewards of Grafting
Grafting transforms fruit tree cultivation by combining desirable traits into a single plant. A well-executed graft can yield fruit in as little as two years, compared to five or more for seed-grown trees. Dwarf trees, created through grafting, fit neatly into British gardens, maximising space and ease of harvest. Grafting also preserves heritage varieties, maintaining biodiversity in UK orchards. With practice, gardeners can master this technique, creating resilient, productive trees that thrive in local conditions.
By following these six steps—understanding grafting, selecting materials, choosing a technique, preparing scion and rootstock, securing the graft, and providing aftercare—gardeners can achieve consistent results. The process requires precision and patience but offers significant rewards. Whether propagating a favourite apple cultivar or rejuvenating an old tree, grafting empowers gardeners to shape their orchards with purpose and skill.
Word count: 2002